Wikimedi'Òc
Modes d'emploi

Cet album fait partie des albums
Cet album photos contient les sous-albums suivants :


Al Worden Apollo 15 CMP (3x4 cropped).jpg - Wabbuh
Apollo-15-LOGO.jpg - Evil Monkey
A15-test.ogg - Campani~commonswiki

Apollo 15 pre-launch planned traverses.jpg - Evil Monkey
Al Worden Apollo 15 CMP.jpg - Andrej-airliner

Dave Scott Apollo 15 CDR.jpg - Andrej-airliner

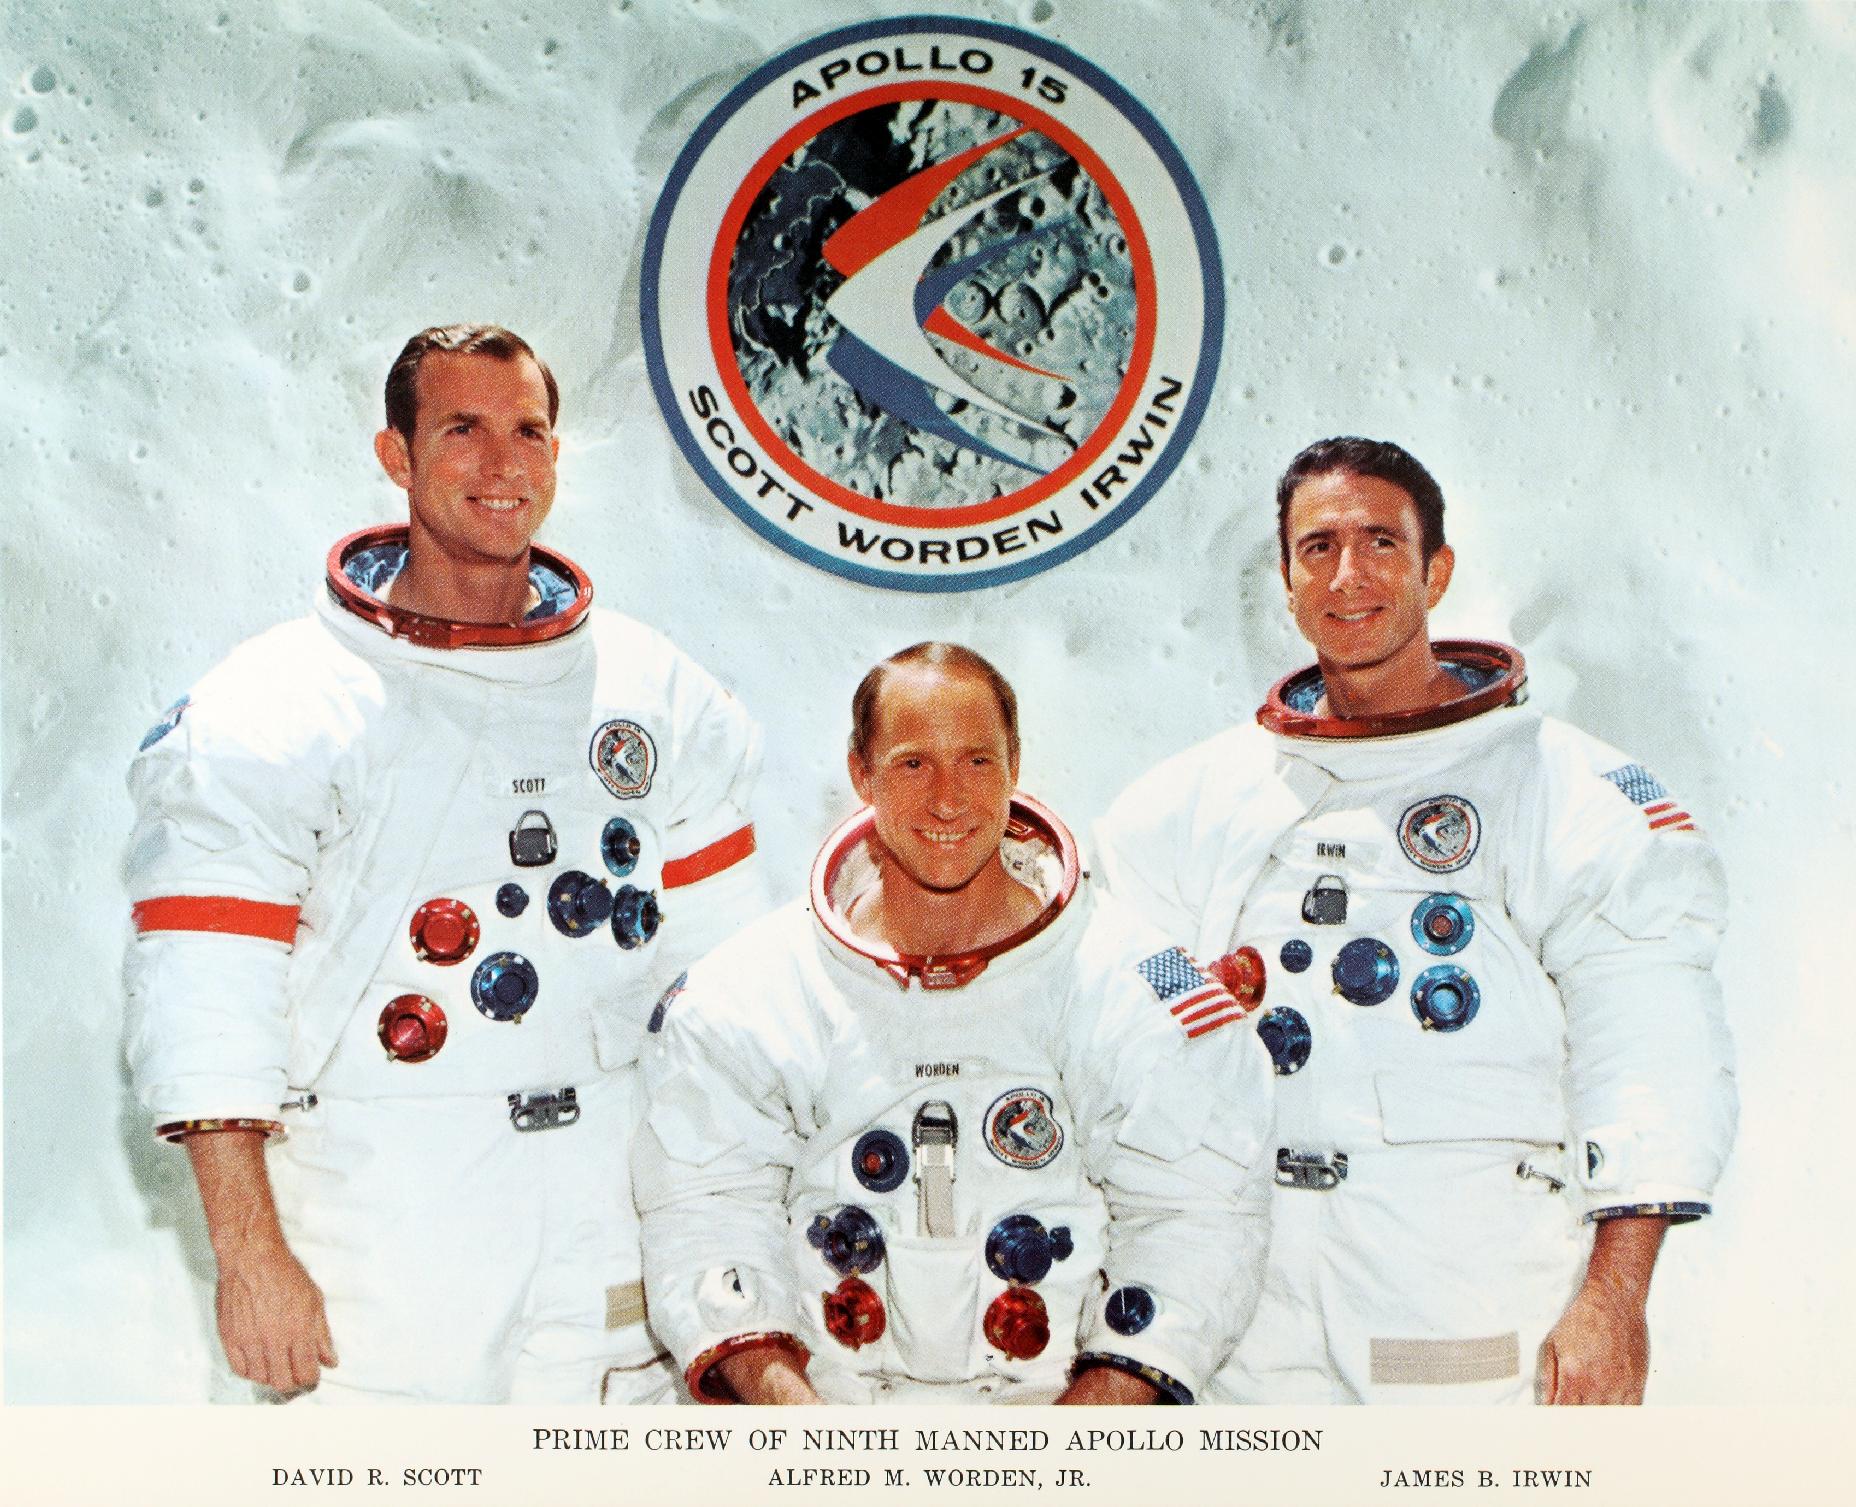
Apollo 15 crew.jpg - Craigboy

Apollo15patch.jpg - ¡0-8-15!

Worden w czasie przygotowań do misji Apollo 15 71pc0488-m.jpg - Caddyshack01

Apollo 15-insignia.png - Ras67

Cylcotron beam experiment at LBNL for apollo space program eye flash investigations.jpg - JohnManuel

Apollo 15 ALSEP.jpg - File Upload Bot (Magnus Manske)

A15-plaque.jpg - Craigboy
Laser Ranging Retroreflector Apollo 15.gif - Undead warrior

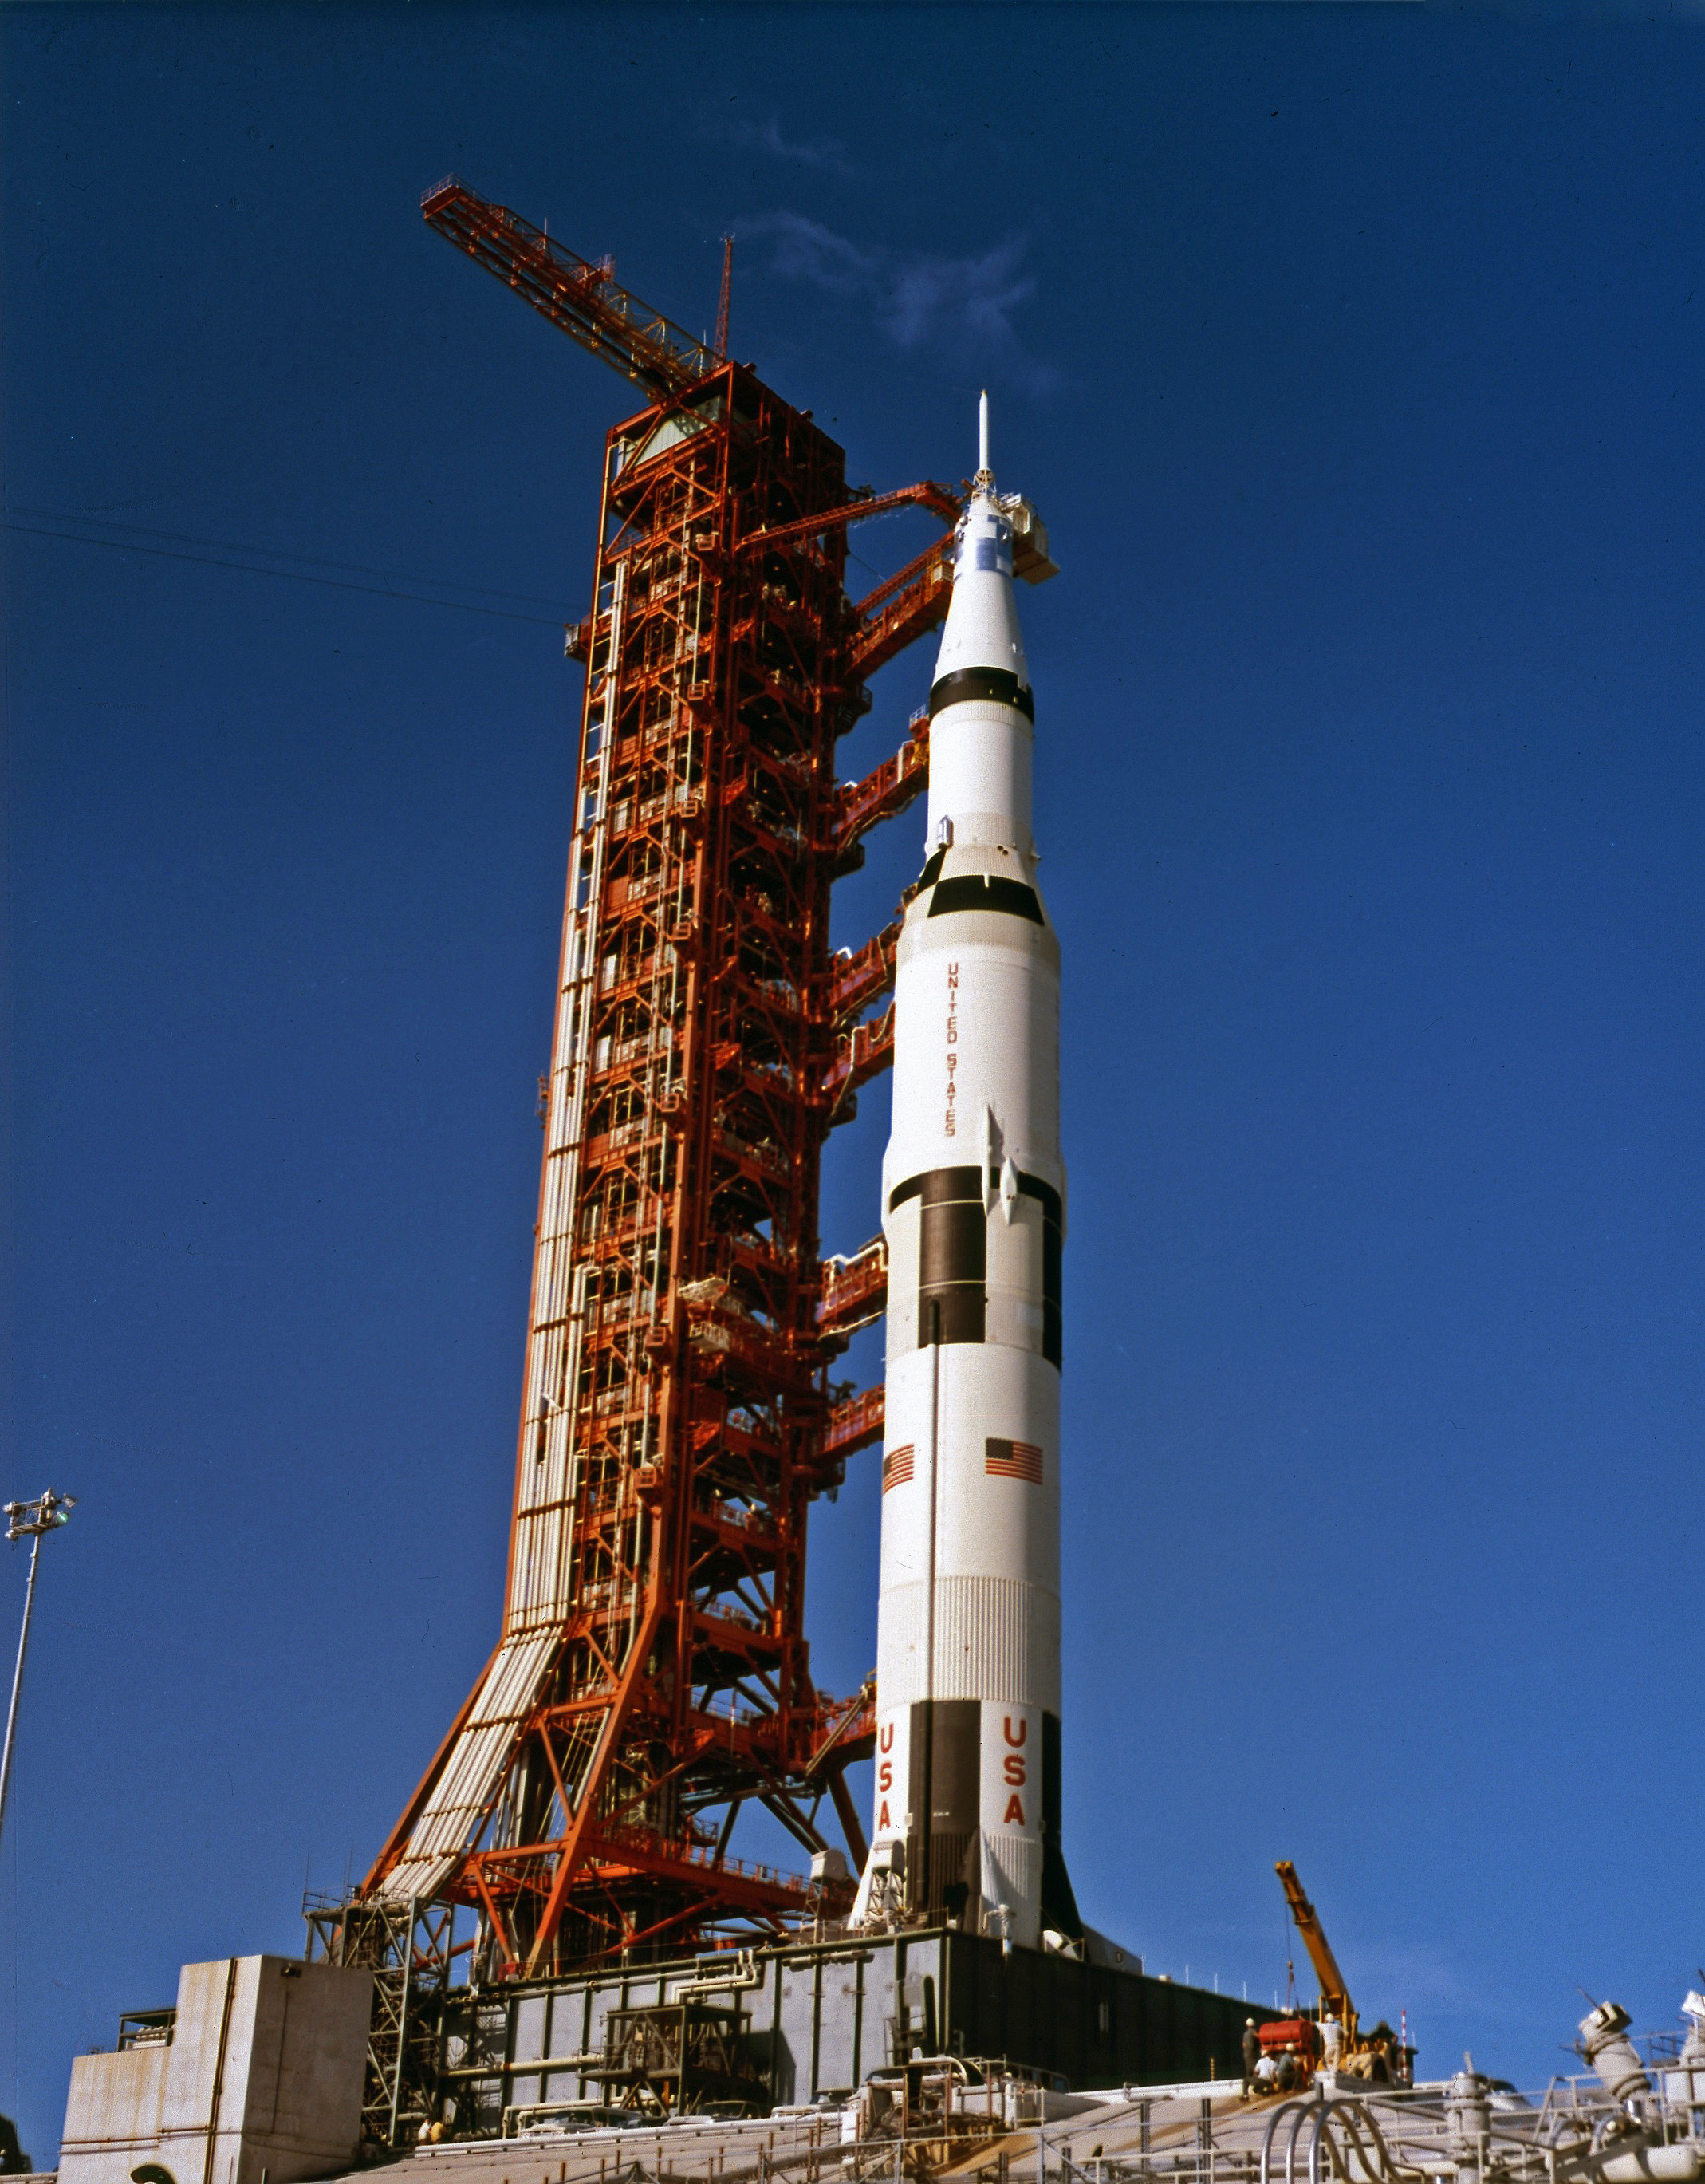
Apollo 15 Rollout - GPN-2000-001118.jpg - BotMultichillT
The Apollo 15 Prime Crew - GPN-2000-001169.jpg - Andrej-airliner

Fletcher and von Braun at Apollo 15 launch - GPN-2000-001620.jpg - BotMultichillT
LRO Apollo15.jpg - Eumeldingens

Apollo-15-lanceerplatform.jpg - Andrej-airliner

RobbinsMedallionApollo15ByPhilKonstantin.jpg - Philkon

Apollo 15 ALSEP.svg - McSush

Apollo 15 at launch pad, lightning.jpg - Andrej-airliner

Apollo 15 rollout.jpg - Igorvyh
Apollo 15 LRV at Boeing plant.jpg - Igorvyh
Ru-Apollo 15 (intro).ogg - AKA MBG

LBJ Moon rock Austin TX.jpg - Nightryder84

Laser Ranging Retroreflector Apollo 15.svg - Gregors
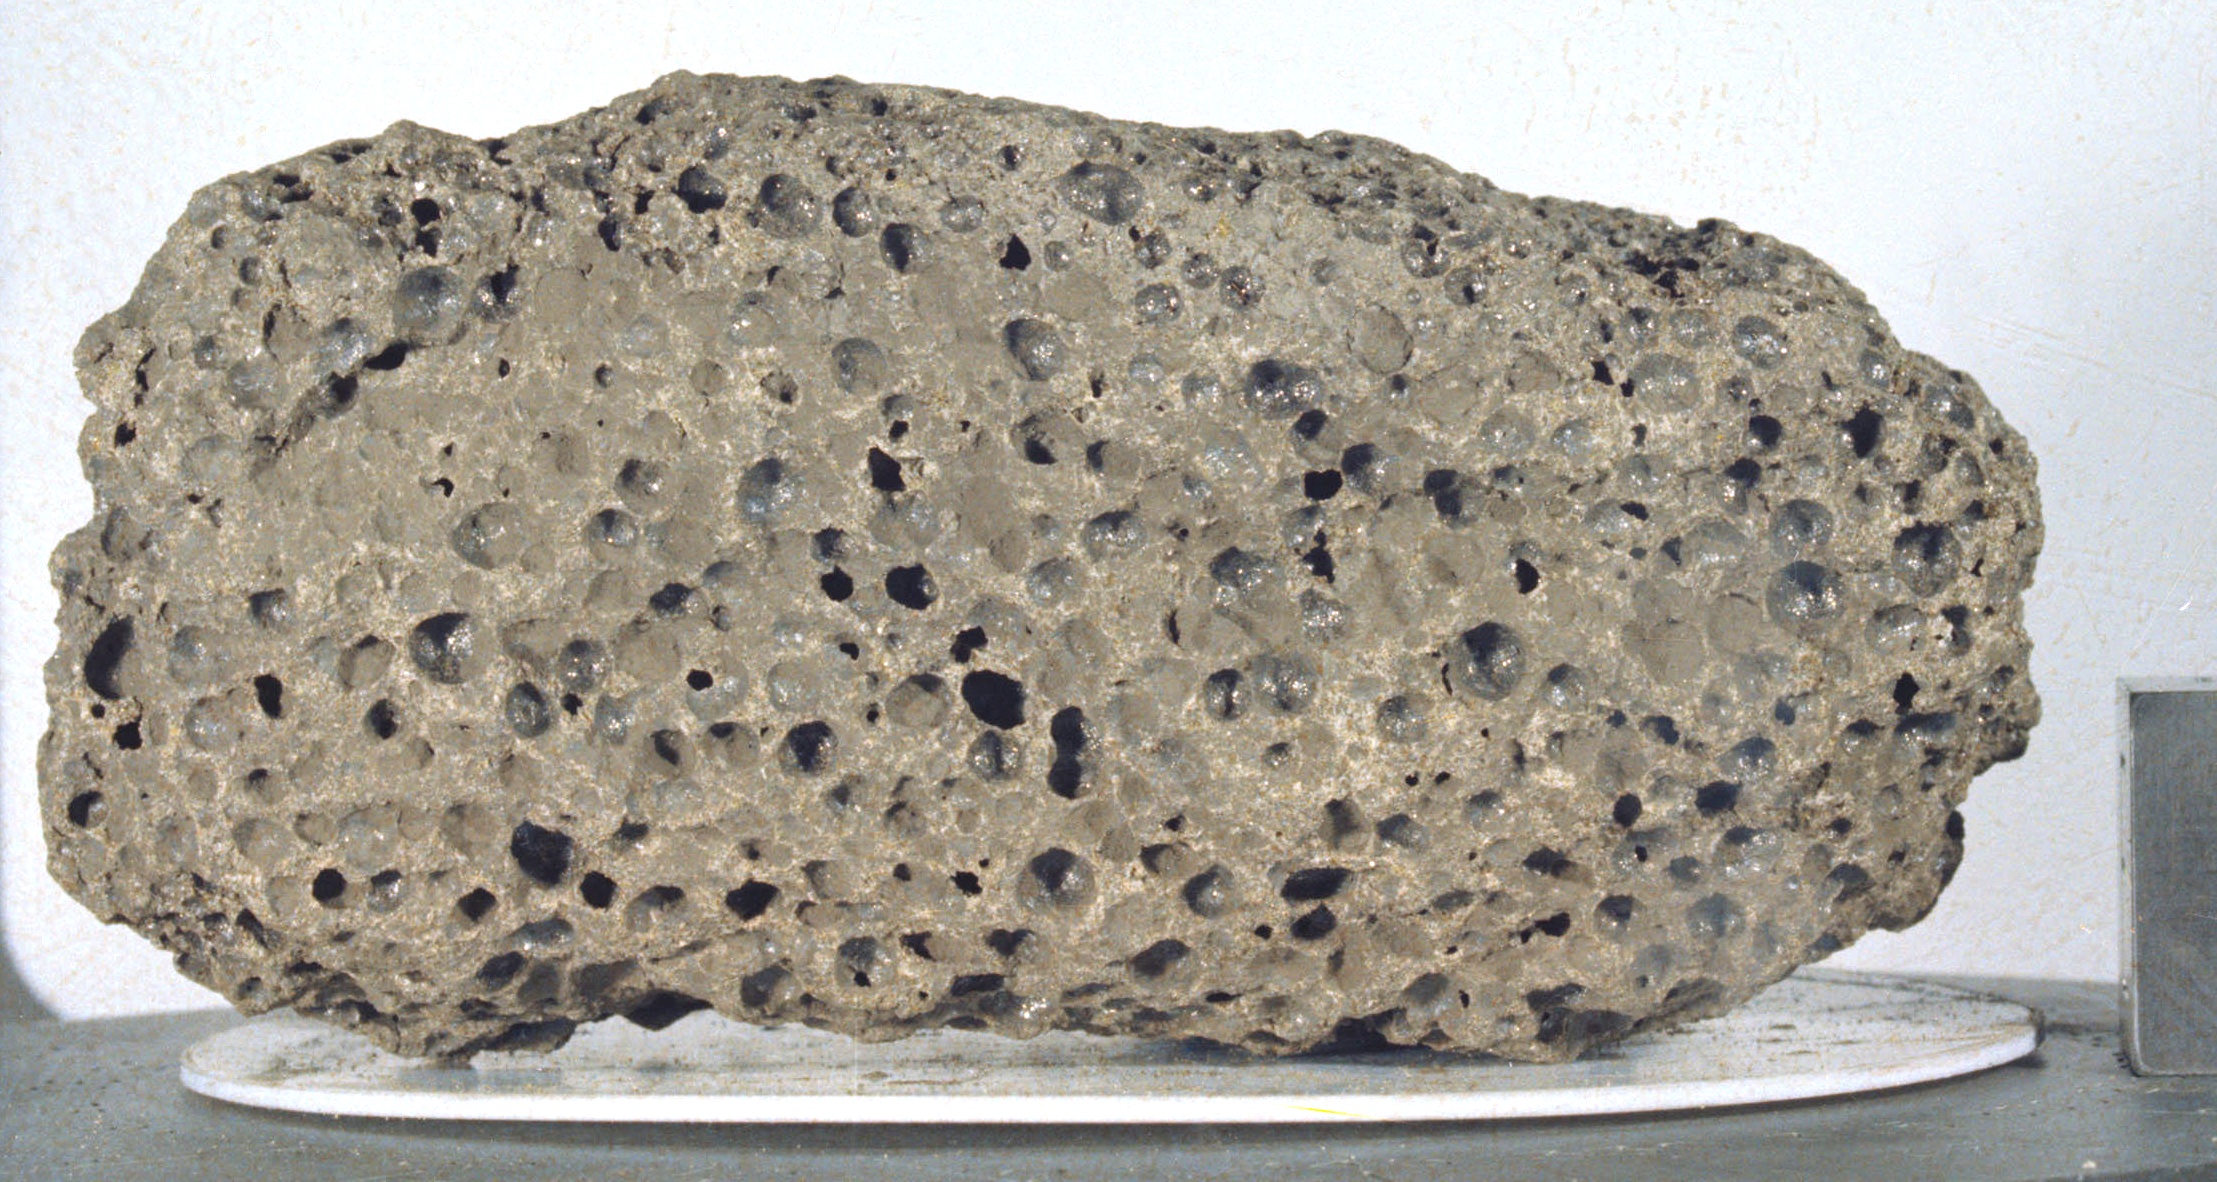
Lunar Olivine Basalt 15555 from Apollo 15 in National Museum of Natural History.jpg - Wknight94

Apollo 15 Solar Corona.jpg - Igorvyh

Apollo 15 Hello Earth.jpg - Igorvyh

Florida by Piotrus 192.JPG - Rotatebot

Rima Hadley - LROC - WAC.JPG - LeastCommonAncestor

Apollo 15 and 17 landing site map LPC-1Serenitatis.jpg - Pline
Apollo 15 crew SDA&SM.jpg - Numéro 1963
Apollo 15 flag crop.jpg - Bulwersator

NASA Ames Visitor Center Moon Rock Exhibition close-up.JPG - Oleg Alexandrov

PIA16934-RoverDistances-20130515.jpg - Huntster
Apollo 15 crew walk to transfer van (71-H-1187).jpg - Huntster

Driving Distances on Mars and the Moon.png - Huntster
KREEP basalt Apollo 15 Sample No 15386.png - Gretarsson

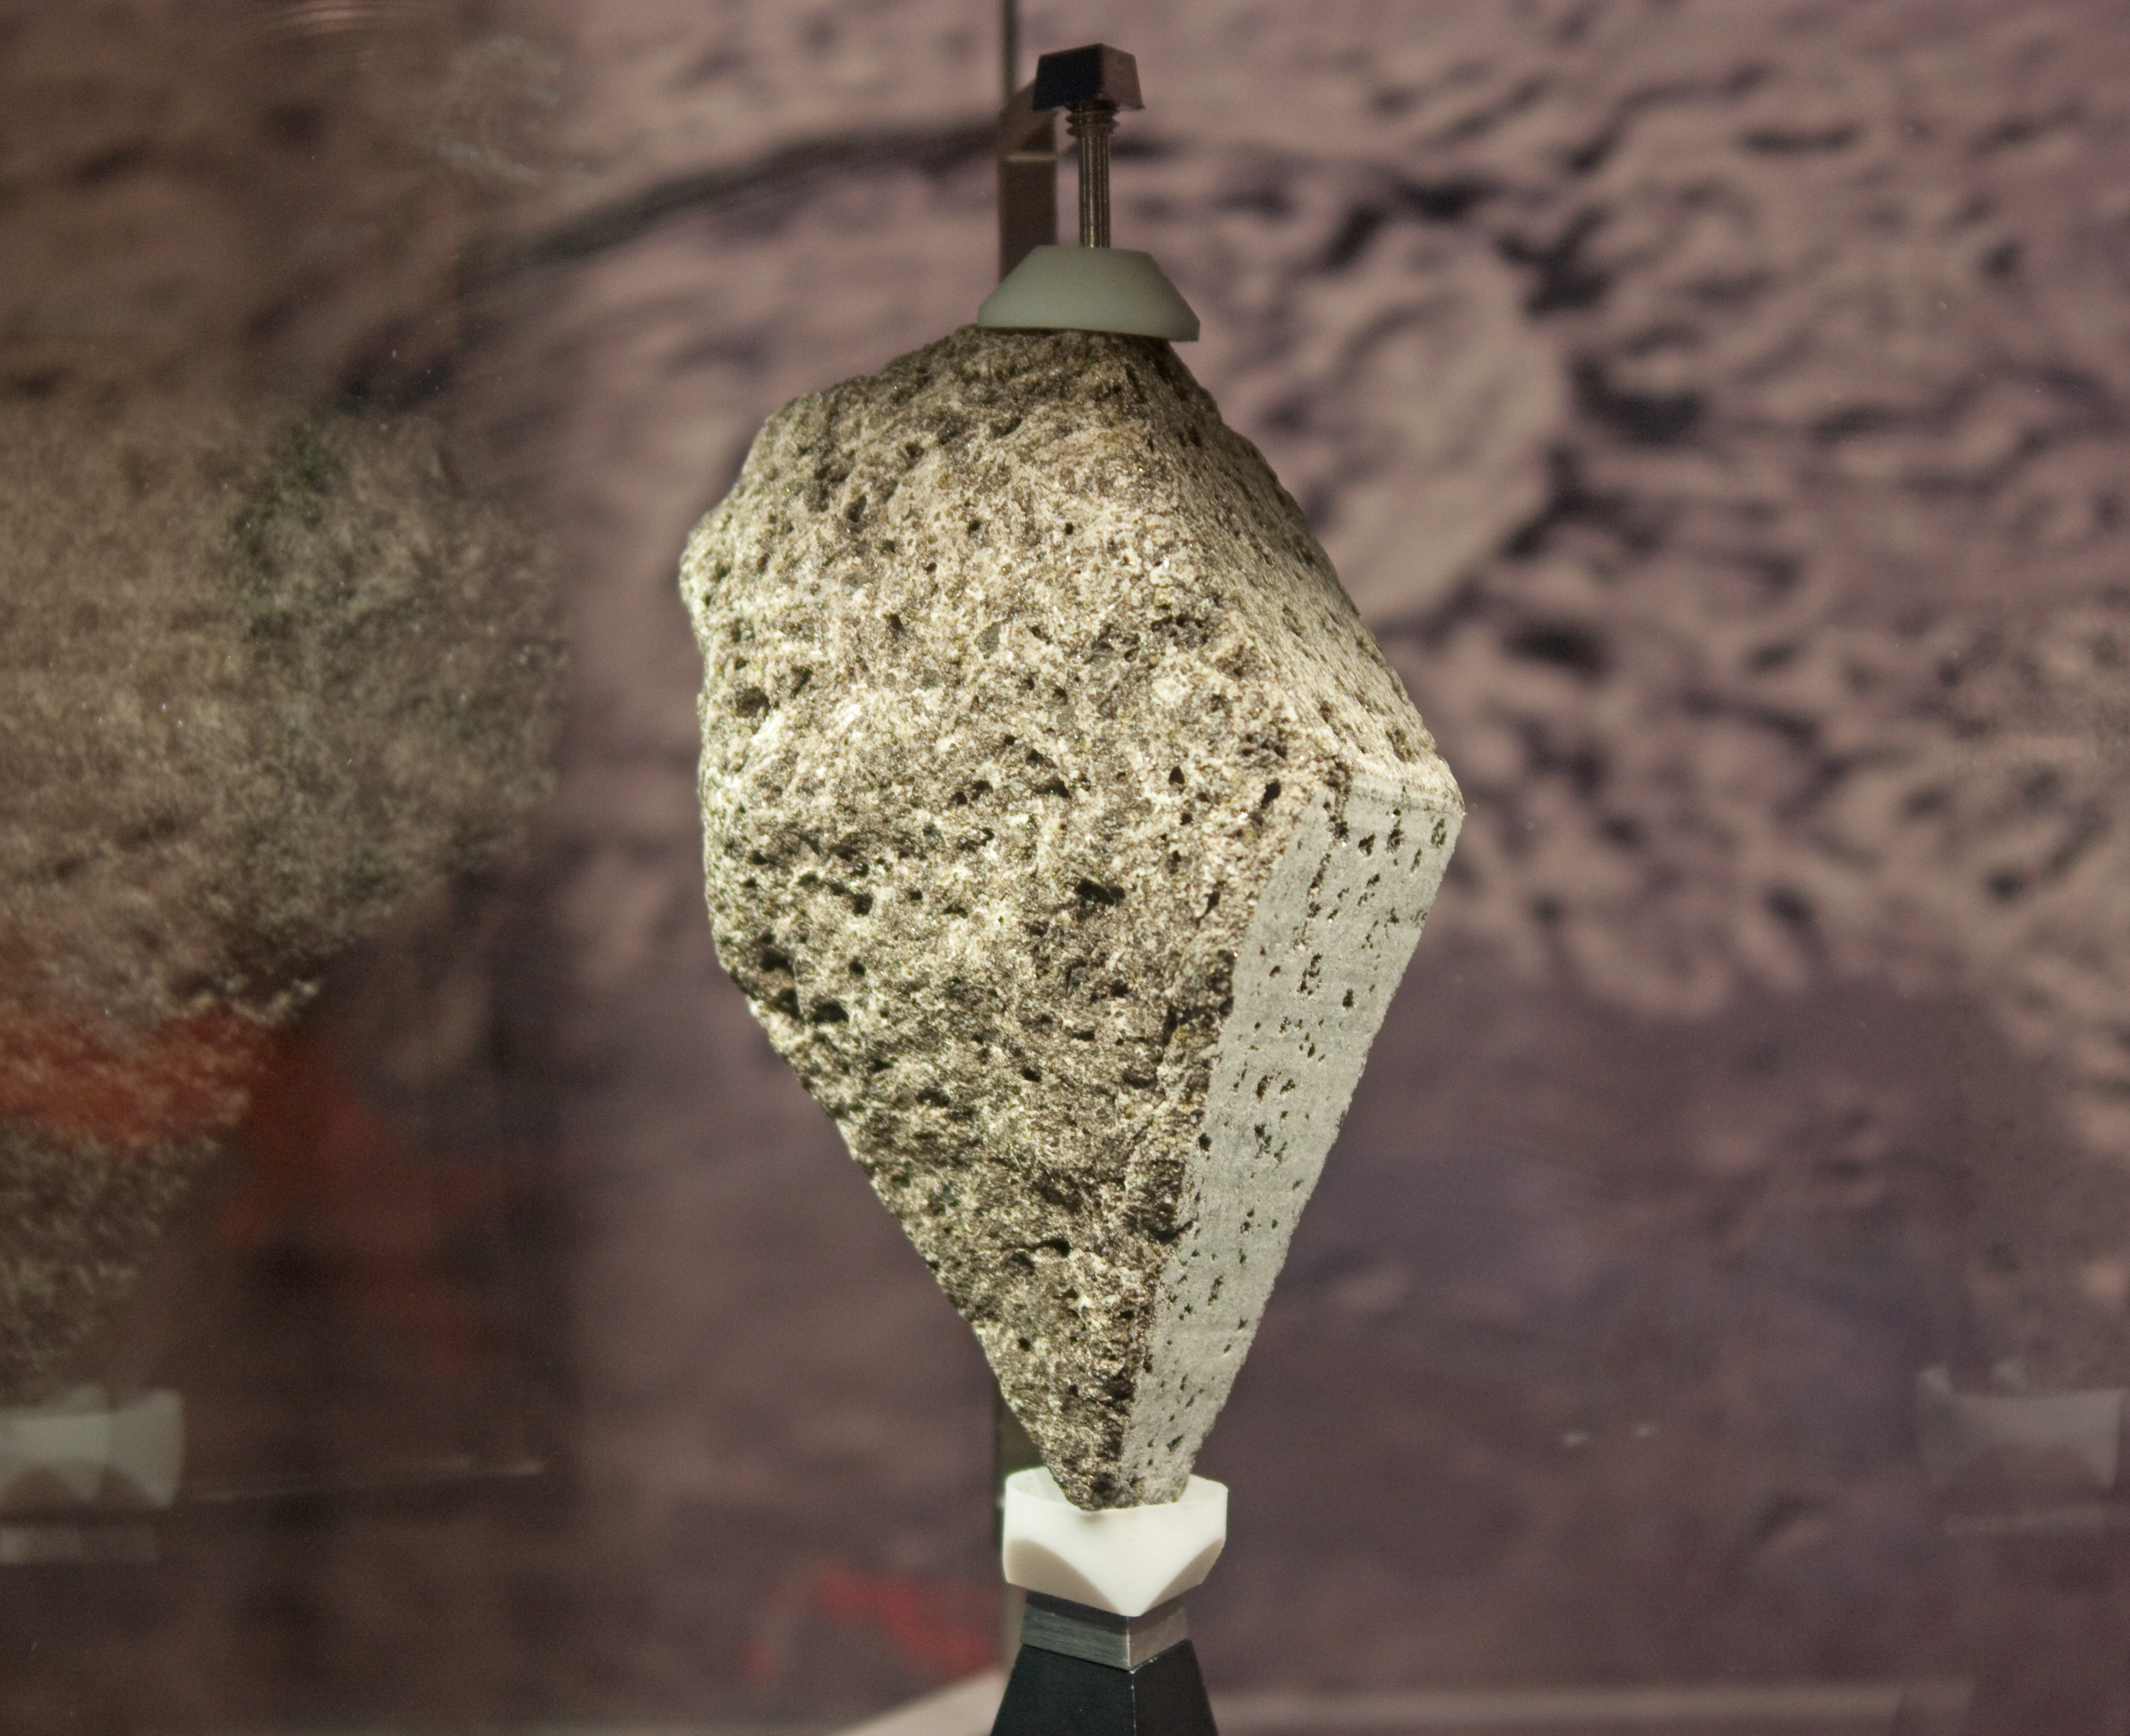
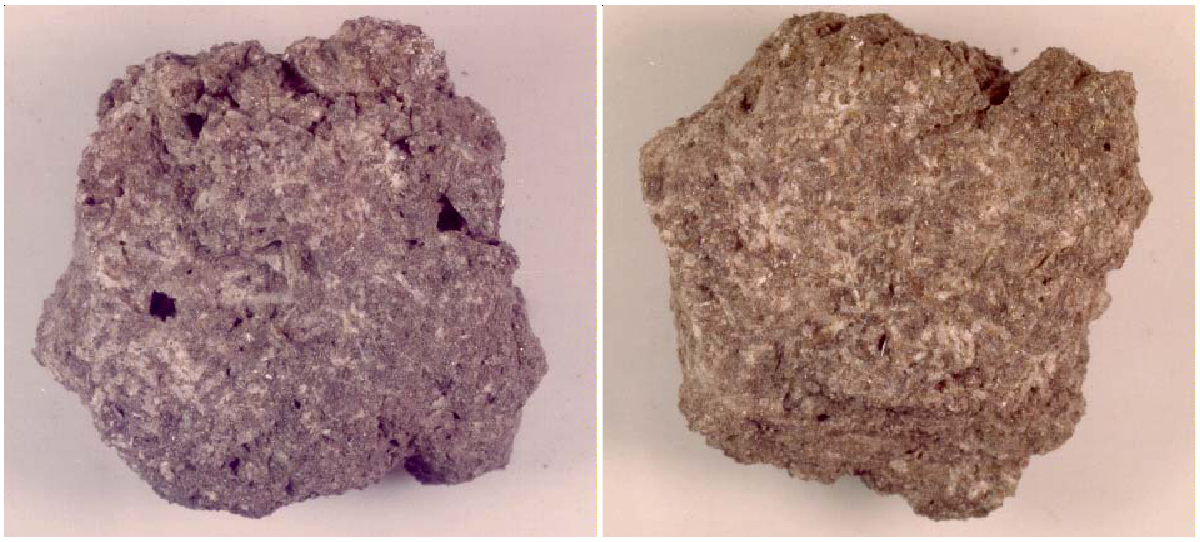
Moon rock from Apollo 15.jpg - Runner1928
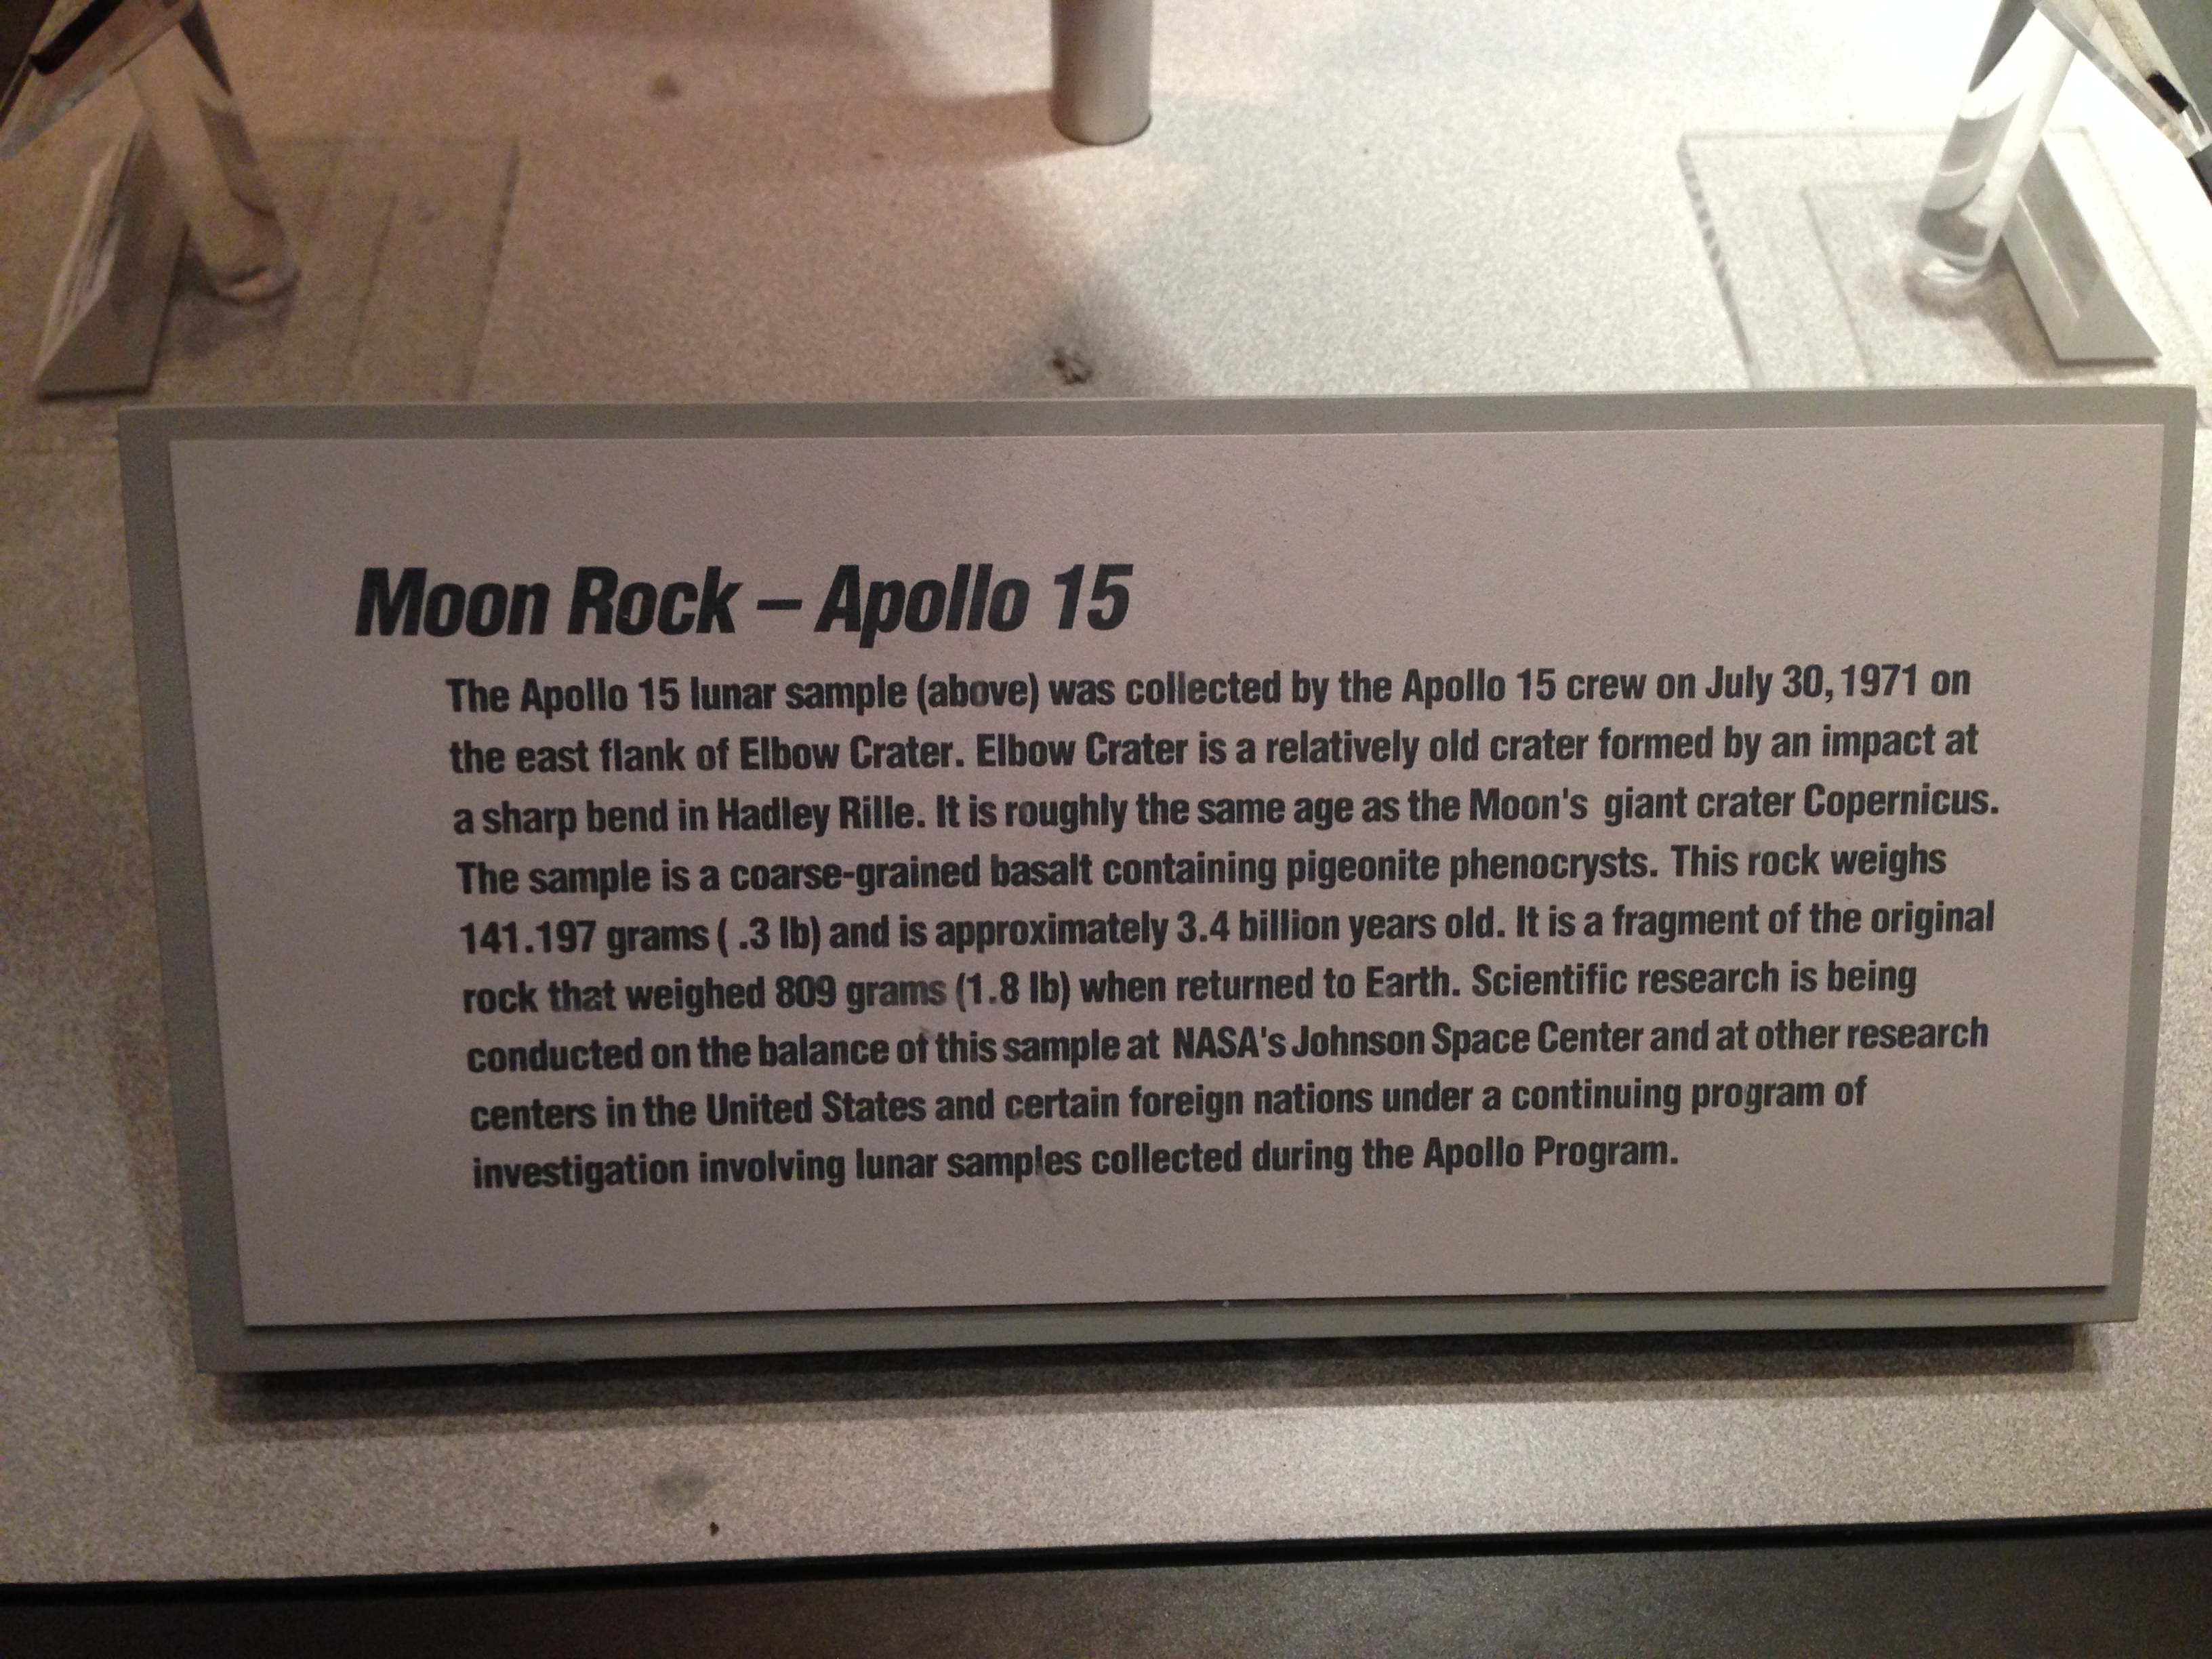
Moon rock from Apollo 15 interpretive sign.jpg - Runner1928
Moon rock from Apollo 15 side.jpg - Runner1928

3,34 Milliarden Jahre altes Mondgestein.jpg - David Kratschmann

Apollo 15 Crew and Family Members (9457429707).jpg - Andrej-airliner

Apollo 15 Flown Silver Robbins Medallion (SN-92).jpg - Godot13

Apollo 15 original CSM flight plan.jpg - HS-XBA
Apollo 15 prime crew.jpg - Andrej-airliner

Apollo space vehicle which leaves the Vehicle Assembly Building (VAB) to Pad A.jpg - Andrej-airliner

An aerial view of Pad A showing the Apollo 15 space vehicle.jpg - Andrej-airliner
Astronaut James B. Irwin suiting up.jpg - Andrej-airliner

Astronaut David R. Scott suiting up.jpg - Andrej-airliner

Apollo 15 rollout from VAB.jpg - Andrej-airliner

Apollo 15 sample 15498 S71-44194.jpg - FastilyClone

Apollo 15 sample 15486 S71-44250.jpg - FastilyClone

Apollo 15 sample 15485 S71-44232.jpg - FastilyClone
Apollo 15 sample 15499 S71-44160.jpg - FastilyClone

A15 sample 15455 S71-43891 cr.jpg - FastilyClone

Lichtenberg crater Fig13.7c.jpg - Jstuby
Lunar sample 15016 S71-45477.jpg - Sneeuwschaap

A15 sample 15445 S71-44129 cr.jpg - FastilyClone

Apollo 15 sample 15495 S71-44209.jpg - FastilyClone

Subsatellite Apollo15.jpg - FastilyClone

Al Worden waits while technicians conduct final suit pressure checks prior to the crew's departure for the pad for launch.jpg - Andrej-airliner

Jim Irwin (left) Al Worden, and Dave Scott pose in front of the VAB during the Saturn V roll-out.jpg - Andrej-airliner

Al Worden, Dave Scott, Deke Slayton, and Jack Schmitt dig into the pre-launch breakfast.jpg - Andrej-airliner

Apollo 15 rollout (1971).jpg - Andrej-airliner

Apollo-15 s-ivb.jpg - Andrej-airliner

Apollo 15 (15012200679).jpg - Vanished Account Byeznhpyxeuztibuo

Apollo 15 Crew and Family Members (9457429707) (2).jpg - Vanished Account Byeznhpyxeuztibuo
The Apollo 15 crew leaves the transfer van at the pad prior to launch.jpg - Andrej-airliner

Apollo 15 crew in White Room prior to launch.jpg - Andrej-airliner

Lunar Roving Vehicle (LRV) Control Console.jpg - Jutulen

ApolloXVLOC.jpg - Wiki LIC

MonsHadleyCratersLOC.jpg - Wiki LIC

A15 PSR Fig 1-4a groundtrack envelope nearside.jpg - Jstuby

A15 PSR Fig 1-4b groundtrack envelope farside.jpg - Jstuby

Apolo15LandingSite.jpg - Wiki LIC
Apolo15LandingSiteCraters.jpg - Wiki LIC

A7-LB Spacesuit.jpg - Sanjay ach

S71-41810 (25466951503).jpg - Hiàn (alt)

Dave Scott in space suit.jpg - Wehwalt

David Scott in spacesuit.jpg - Wehwalt

Stafford Air & Space Museum, Weatherford, OK, US (60).jpg - Bubba73

A15.s74 41836.jpg - Wehwalt

S71-41759.jpg - Wehwalt

S71-41408.jpg - Wehwalt

Apollo space vehicle which leaves the Vehicle Assembly Building (VAB) to Pad A (cropped).jpg - Cléééston

Apollo 15 traverses.jpg - Pline
Apollo 15 landing site 3D.stl - BugWarp

Carl Albert and an unidentified man looking at Apollo 15 plaque in Speaker's office.jpg - AlessioH

Presentation of Apollo 15 plaque. In the Speaker's office. Staff present, including Carl Albert, Louise Butler, Tamara Kitchens, and Sherry Tonubbee.jpg - Caddyshack01

Carl Albert with Apollo 15 astronauts.jpg - AlessioH

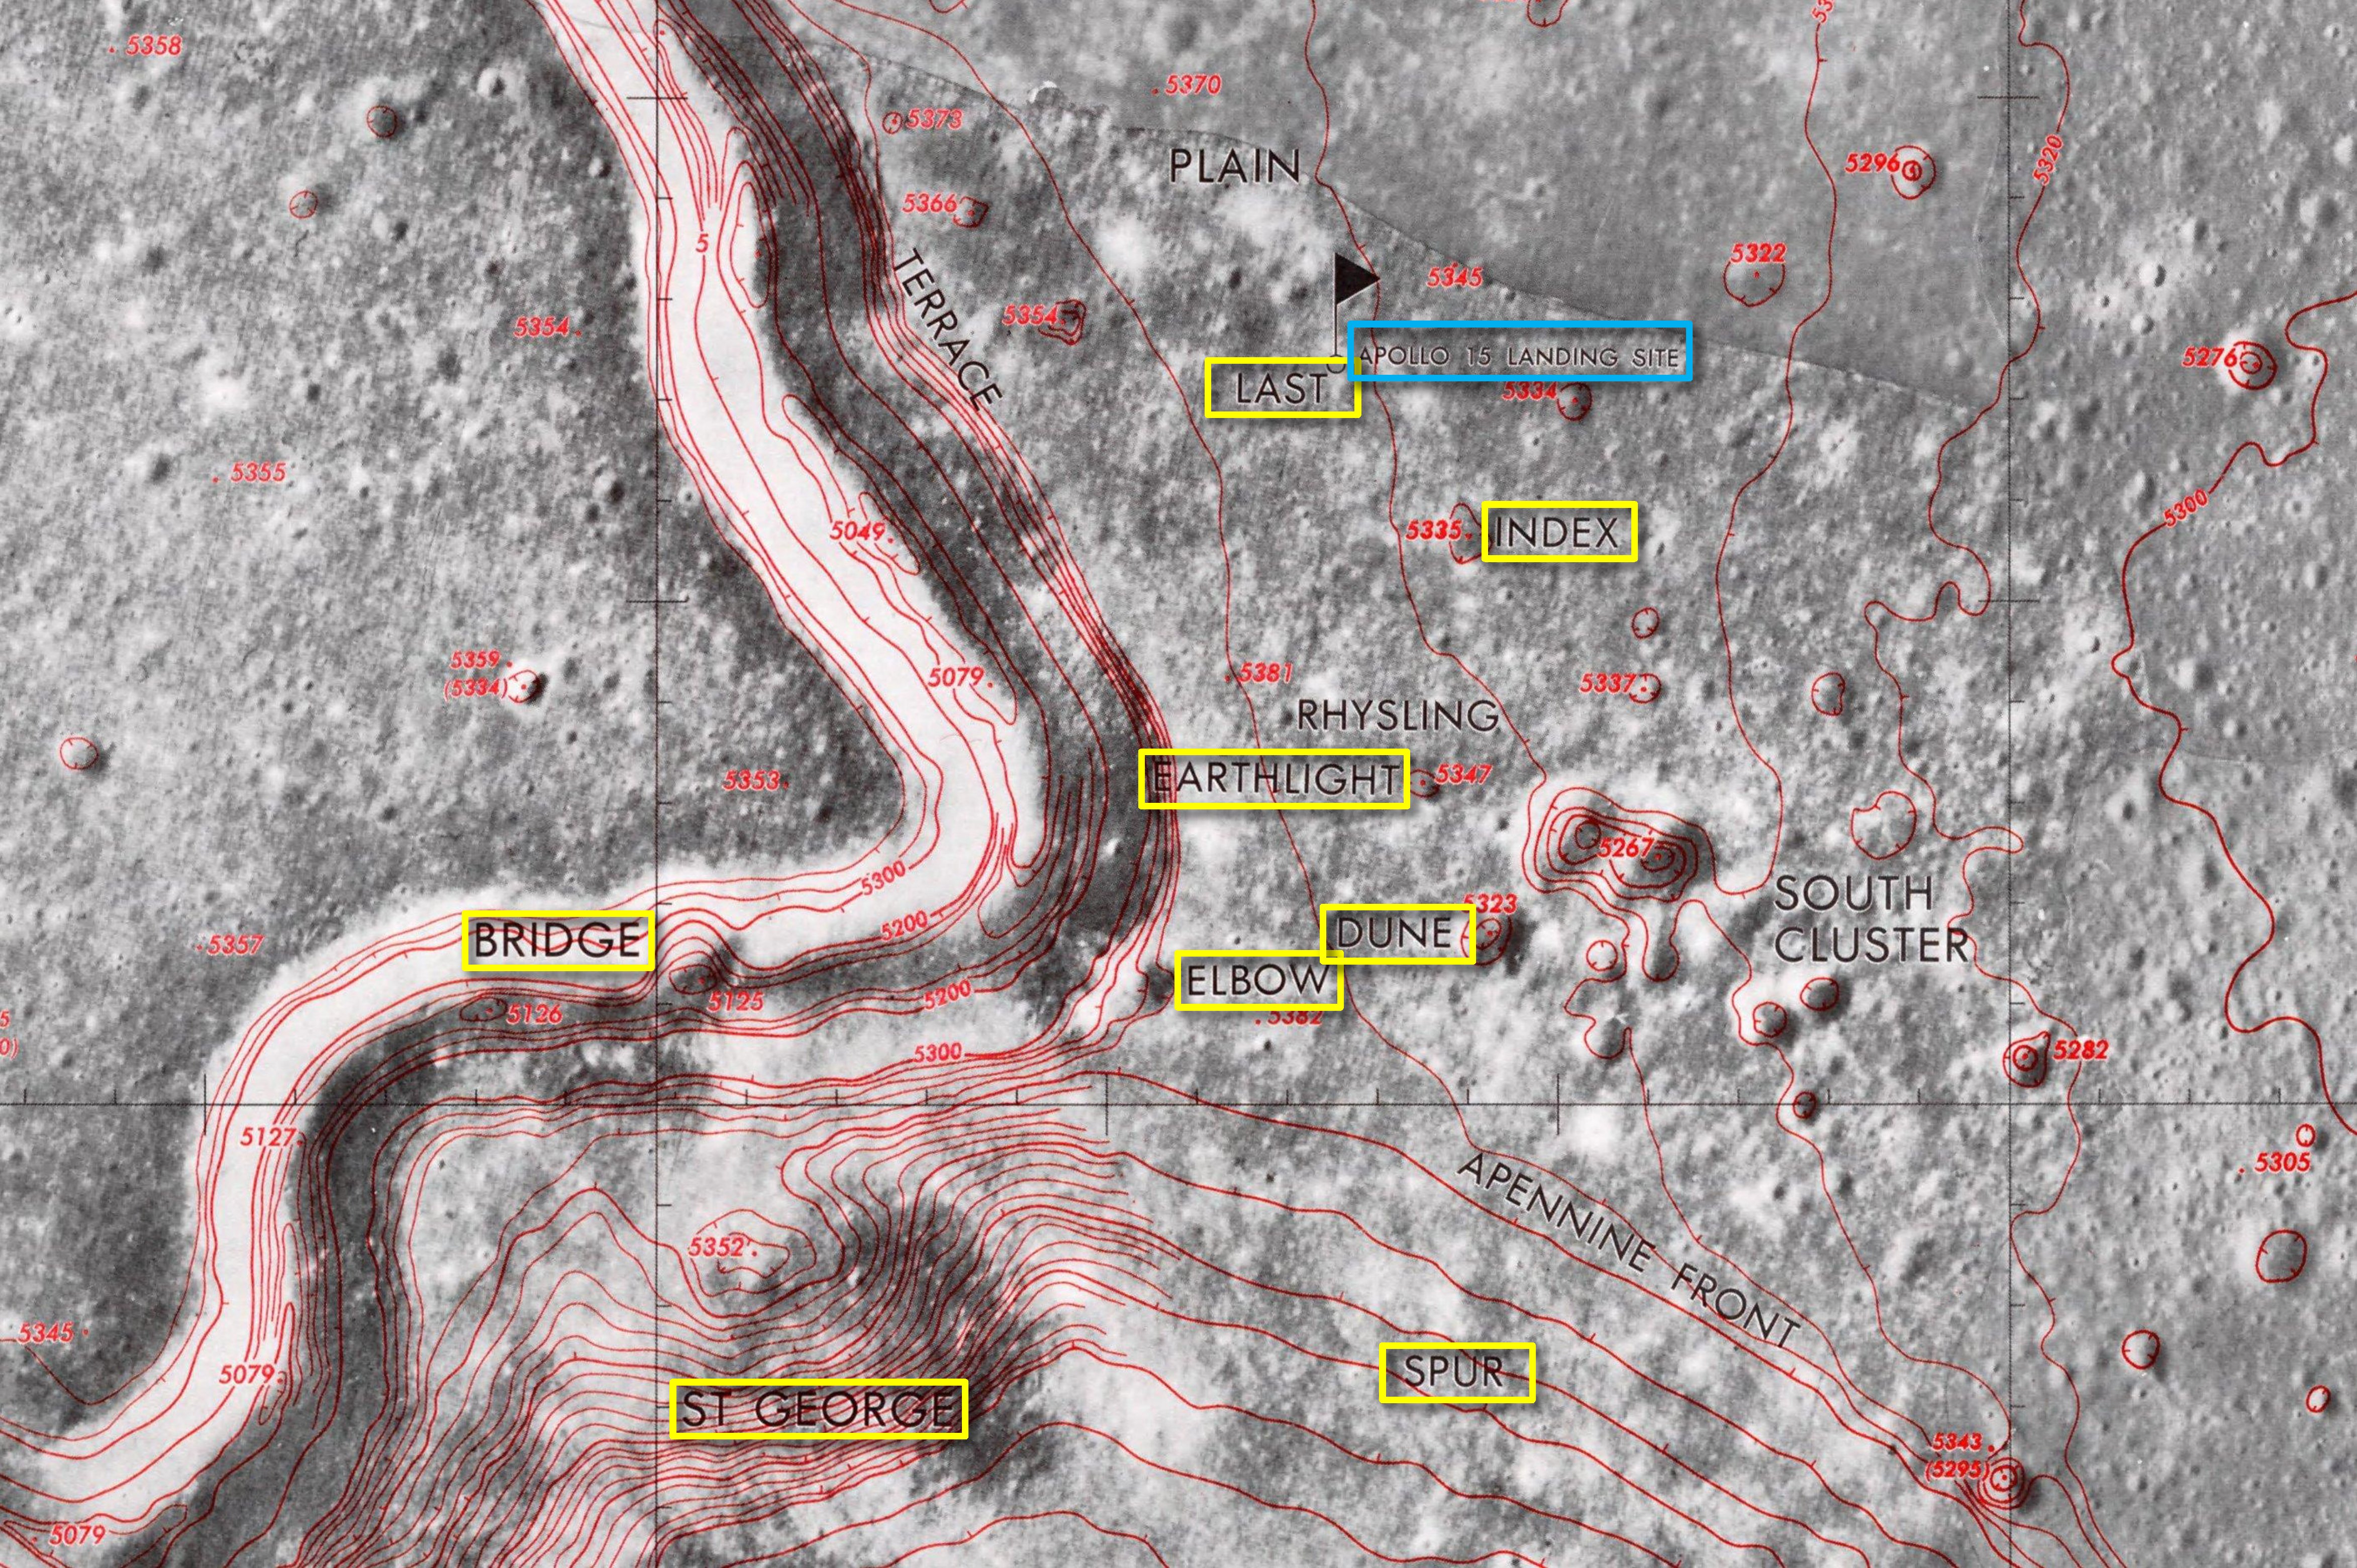
Apollo-15-landing-site.jpg - Keesscherer
The Apollo 15 Saturn V on Pad 39A.jpg - Andrej-airliner

View of the KSC firing room on Apollo 15 launch day.jpg - Andrej-airliner
Hammer n feather, Apollo 15.gif - Bernard de Go Mars
Apollo15core.tif - Retallack

UV photograph of the increasing crescent Earth during the homeward journey, Apollo 15, August 1971 (51119347909).png - Sentinel user

Apollo 15 breakfast.jpg - Andrej-airliner
Apollo 15 astronauts walk to transfer van.jpg - Andrej-airliner

Apollo 15 Countdown Demonstration Test.jpg - Andrej-airliner

150520 Apollo 15 Moon Sea Stone.jpg - 名古屋太郎

Apollo 15 Lunar Module Prior to Extraction - Flickr - Apollo Image Gallery.jpg - Red panda bot

Apollo 15 Lunar Module Umbilical Cord (5383523252).jpg - Siloepic

Navigation Map used on the first Lunar Rover, Apollo 15 (51338175393).jpg - ToyitomaOda

Lunar sample 15555, Tellus Museum.jpg - Bubba73

Lunar sample 15555, Tellus Museum (02).jpg - Bubba73

Lunar sample 15555, Tellus Museum (03).jpg - Bubba73

Lunar sample 15555, Tellus Museum (04).jpg - Bubba73

Lunar sample 15555, Tellus Museum (05).jpg - Bubba73

Lunar sample 15555, Tellus Museum (06).jpg - Bubba73

Lunar sample 15555, Tellus Museum (07).jpg - Bubba73

Lunar sample 15555, Tellus Museum (08).jpg - Bubba73

Lunar sample 15555, Tellus Museum (09).jpg - Bubba73
Apollo14.jpg - Vikipedisayfam27

Follow the Tracks (LROC491 - station6a edit).png - OptimusPrimeBot

Moon - Apollo 15 (50402631886).png - OptimusPrimeBot

4 O'Clock LM Pan at the end of EVA-2.webp - Usedtoknoweverything

12 O'Clock LM Pan at the end of EVA-2.webp - Usedtoknoweverything

8 O'Clock LM Pan at the end of EVA-2.webp - Usedtoknoweverything

A15 S71-47077.webp - Usedtoknoweverything

B&W of LM from the Northeast.webp - Usedtoknoweverything

A15 S71-47080.webp - Usedtoknoweverything

Black & White SEVA Pan 1 HR East.webp - Usedtoknoweverything

Black & White SEVA Pan 1 HR North.webp - Usedtoknoweverything

Combined Post-SEVA Window Pan.webp - Usedtoknoweverything

Black & White SEVA Pan 1.webp - Usedtoknoweverything
Black & White SEVA Pan 1 HR South.webp - Usedtoknoweverything

Dave Station 10 500-mm West Wall Continuation.webp - Usedtoknoweverything

Dave Station 10 500-mm Top of the West Wall Outcrops.webp - Usedtoknoweverything

Dave Rover.webp - Usedtoknoweverything

Dave's Post-SEVA Window Pan.webp - Usedtoknoweverything

Dave's Station 8 Pan.webp - Usedtoknoweverything

EVA-3 ALSEP Pan No. 1.webp - Usedtoknoweverything

Drilling activities.webp - Usedtoknoweverything
EVA-1 Closeout.webp - Usedtoknoweverything

EVA-3 ALSEP Pan No. 2 - Hadley and LM.webp - Usedtoknoweverything

EVA-3 ALSEP Pan No. 2 - LM.webp - Usedtoknoweverything
EVA-3 ALSEP Pan No. 2 - Rover.webp - Usedtoknoweverything

EVA-3 ALSEP Pan No. 2.webp - Usedtoknoweverything

EVA-3 Closeout, 500mm, Big Rock Mountain and foreground hill in the Swann Range.webp - Usedtoknoweverything

EVA-3 Closeout, 500-mm, Left flank of 'leading edge' hill.webp - Usedtoknoweverything

EVA-3 Return to LM.webp - Usedtoknoweverything

EVA-3 Closeout, 500-mm, Mt Hadley Delta Summit.webp - Usedtoknoweverything

First Post-EVA-3 500-mm Pan of the North Complex - Alternate.webp - Usedtoknoweverything

First Station 2 Pan.webp - Usedtoknoweverything

First Post-EVA-3 500-mm Pan of the North Complex.webp - Usedtoknoweverything

High Resolution Mt. Hadley Composite.jpg - Usedtoknoweverything
High-resolution portrait of Dave carrying the 500-mm.webp - Usedtoknoweverything

Jim's ALSEP Pan at the end of EVA-2 - mini-pan.webp - Usedtoknoweverything

Jim's Post-SEVA Window Pan.webp - Usedtoknoweverything

LM from the southeast.webp - Usedtoknoweverything

Post-EVA-3 500-mm Hill 305.webp - Usedtoknoweverything

JSC2007e045379.jpg - Usedtoknoweverything

Post-EVA-3 Composite Window Pan.webp - Usedtoknoweverything

Post-EVA-3 500-mm Mt. Hadley Delta.webp - Usedtoknoweverything

Post-EVA-3 LMP Window Pan.webp - Usedtoknoweverything

Rover Pan.webp - Usedtoknoweverything

Seatbelt Basalt Pan.webp - Usedtoknoweverything

Second Post-EVA-3 500-mm Pan of the North Complex - Alternate.webp - Usedtoknoweverything

Second Station 2 Pan - Alternate.webp - Usedtoknoweverything

Second Station 2 Pan - Hadley Swann.jpg - Usedtoknoweverything

Second Post-EVA-3 500-mm Pan of the North Complex.webp - Usedtoknoweverything
Second Station 2 Pan - Up-rille.jpg - Usedtoknoweverything

Second Station 2 Pan.webp - Usedtoknoweverything

SEVA 500-mm Pan of Hill 305.webp - Usedtoknoweverything

SEVA 500-mm Pan of Hill 305 HR.webp - Usedtoknoweverything

SEVA 500-mm Pan of a northern portion of Hill 305.jpg - Usedtoknoweverything

SEVA 500-mm Pan of Silver Spur HR.webp - Usedtoknoweverything

SEVA 500-mm Portrait of Chain Crater.webp - Usedtoknoweverything

SEVA 500-mm Portrait of Pluton Crater.webp - Usedtoknoweverything

SEVA Color Pan Hadley Silver.jpg - Usedtoknoweverything

SEVA Color Pan HR North.webp - Usedtoknoweverything

SEVA Color Pan.jpg - Usedtoknoweverything

South.webp - Usedtoknoweverything
Station 1 Pan - Four frame North.webp - Usedtoknoweverything

Station 1 Pan - Two-frame down-Sun.webp - Usedtoknoweverything
Station 1 Pan - Stereo.jpg - Usedtoknoweverything

Station 2 500-mm Pan of Trophy Point, Combined.webp - Usedtoknoweverything

Station 2 500-mm Pan of Trophy Point, First Strip.webp - Usedtoknoweverything

Station 2 500-mm Pan of Trophy Point, Second Strip.webp - Usedtoknoweverything

Station 2 500-mm Pan of Trophy Point, Vertical Strip.webp - Usedtoknoweverything

Station 2 500-mm Shots of the Rille Bottom - 1st seq.webp - Usedtoknoweverything

Station 2 500-mm Shots of the Rille Bottom.webp - Usedtoknoweverything

Station 2 500-mm Shots of the Rille Bottom - 2nd seq.webp - Usedtoknoweverything
Station 4 Pan HR.webp - Usedtoknoweverything

Station 4 Pan.webp - Usedtoknoweverything

Station 6 500-mm Hadley Delta Summit Outcrops.webp - Usedtoknoweverything

Station 6 500-mm Hill 305.webp - Usedtoknoweverything

Station 6 500-mm Hadley Rille.webp - Usedtoknoweverything

Station 6 500-mm Leading Edge of Swann Mountain.webp - Usedtoknoweverything

Station 6 500-mm Lineations.webp - Usedtoknoweverything

Station 6 500-mm Left Flank of Mt. Hadley.webp - Usedtoknoweverything

Station 6 500-mm LM and Pluton Crater.webp - Usedtoknoweverything

Station 6 500-mm Lower Portions of the Left Flank of Mt. Hadley.webp - Usedtoknoweverything

Station 6 500-mm Mt. Hadley Composite.webp - Usedtoknoweverything

Station 6 500-mm Mt. Hadley Summit, First Series.webp - Usedtoknoweverything
Station 6 500-mm Mt. Hadley Summit, Second Series.webp - Usedtoknoweverything

Station 6 500-mm Vertical Sequence of Mt. Hadley - Alternate.jpg - Usedtoknoweverything

Station 6 500-mm Vertical Sequence of Mt. Hadley.webp - Usedtoknoweverything

Station 6 500-mm View to the East.webp - Usedtoknoweverything

Station 6 Jim's First Pan.webp - Usedtoknoweverything

Station 6 Jim's Second Pan - Portion.webp - Usedtoknoweverything

Station 6 Jim's Second Pan.webp - Usedtoknoweverything
Station 6a Pan -Boulder.webp - Usedtoknoweverything

Station 6a Pan.webp - Usedtoknoweverything

Station 7 Pan - Eastern Horizon.webp - Usedtoknoweverything

Station 7 Pan - Inbound Rover Tracks from Station 6a.webp - Usedtoknoweverything

Station 7 Pan - Rover and Spur Crater - Alternate.webp - Usedtoknoweverything

Station 7 Pan - Rover and Spur Crater.webp - Usedtoknoweverything

Station 7 Pan.webp - Usedtoknoweverything

Station 7 White Vein Rock - Alternate.webp - Usedtoknoweverything

Station 7 White Vein Rock.webp - Usedtoknoweverything

Station 9a 500-mm Mare Surface west of Hadley Rille.jpg - Usedtoknoweverything

Station 9a 500-mm Horizontal Strip along West Wall Outcrops.webp - Usedtoknoweverything

Station 9 Pan.webp - Usedtoknoweverything

Station 9a 500-mm Vertical Sequence of Debris-Filled Crater.webp - Usedtoknoweverything

Station 9a 500-mm Talus Slope below West Wall Outcrops.webp - Usedtoknoweverything

Station 9a 500-mm West Wall Outcrops, Combined HR.jpg - Usedtoknoweverything

Station 9a 500-mm West Wall Outcrops, Combined.webp - Usedtoknoweverything

Station 9a 500-mm West Wall Outcrops, First Vertical Strip.webp - Usedtoknoweverything

Station 9a 500-mm West Wall Outcrops, Second Vertical Strip.webp - Usedtoknoweverything
Station 9a 500-mm, Debris-Filled Crater and Slope Below.webp - Usedtoknoweverything

Station 9a 500-mm West Wall Outcrops, Third Vertical Strip.webp - Usedtoknoweverything

Station 9a 500-mm, Debris-Filled Crater to Trophy Point - Extended.webp - Usedtoknoweverything

Station 9a East Wall of Hadley Rille - Alternate.webp - Usedtoknoweverything

Station 9a 500-mm, West Wall Boulders.webp - Usedtoknoweverything

Station 9a East Wall of Hadley Rille.webp - Usedtoknoweverything

Station 9a Pan - Dave at Rover.webp - Usedtoknoweverything
Station 9a Pan - Dave at work.webp - Usedtoknoweverything

Station 9a Pan North.webp - Usedtoknoweverything

Station 9a Pan.webp - Usedtoknoweverything

Station 10 500-mm Additional Vertical Sequence of West Wall.webp - Usedtoknoweverything

Station 10 500-mm Sequence below the West Wall Crater.webp - Usedtoknoweverything

Station 10 500-mm Sequence of the Mare Surface beyond the West Wall Crater.webp - Usedtoknoweverything

Station 10 500-mm Sequence of the West Wall Crater.webp - Usedtoknoweverything

Station 10 500-mm Top of the Talus Slope.webp - Usedtoknoweverything

Station 10 500-mm Trophy Point.webp - Usedtoknoweverything
Station 10 500-mm Vertical Sequence of West Wall.webp - Usedtoknoweverything

Station 10 500-mm Vertical Strip Through the West Wall Crater.webp - Usedtoknoweverything

Station 10 500-mm West Wall Crater Composite.webp - Usedtoknoweverything

Station 10 500-mm West Wall Outcrops Composite.webp - Usedtoknoweverything

Station 10 500-mm West Wall Crater, Composite of Horizontal Strips.webp - Usedtoknoweverything

Station 10 Jim's Pan.webp - Usedtoknoweverything

View of the Rille South thru West to North.webp - Usedtoknoweverything

View to the South Along the Rille.webp - Usedtoknoweverything

VIP Site Pan.webp - Usedtoknoweverything

West view.webp - Usedtoknoweverything

SEVA Color Pan HR South.webp - Usedtoknoweverything

Post-EVA-3 CDR Window Pan - Alternate.jpg - Usedtoknoweverything

Post-EVA-3 500mm.webp - Usedtoknoweverything

Station 1 Pan.jpg - Usedtoknoweverything

Station 1 Pan - Stereo - Trimmed.jpg - Usedtoknoweverything

First Station 2 Pan - Glass boulder.webp - Usedtoknoweverything

First Station 2 Pan - Up-Rille.jpg - Usedtoknoweverything

Station 6 500-mm Mt. Hadley Summit, First Series - Alternate.jpg - Usedtoknoweverything

Station 6a pan - East.webp - Usedtoknoweverything

Jim's ALSEP Pan at the end of EVA-2.webp - Usedtoknoweverything

Station 9a 500-mm West Wall Crater.webp - Usedtoknoweverything
Station 9a 500-mm, Debris-Filled Crater to Trophy Point - Really Extended.webp - Usedtoknoweverything

Station 10 500-mm Slope into Hadley Rille from the East Rim.webp - Usedtoknoweverything

Apollo 15 - Genesis Rock.webp - Usedtoknoweverything

Rover 'RIP' Pan 1.jpg - Usedtoknoweverything

Rover 'RIP' Pan 3.jpg - Usedtoknoweverything

Rover 'RIP' Pan 2.jpg - Usedtoknoweverything

Apollo 15 - EVA 3 - AS15-82-11055 to 11057.jpg - Usedtoknoweverything

Apollo 15 - As15-88-11895-11925 Panorama.jpg - Usedtoknoweverything
As15-86-1160011602 Panorama.jpg - Usedtoknoweverything

Saturn V aerial.jpg - James Doehring

Saturn Apollo Program (7120051).jpg - OptimusPrimeBot

Dave Scott Apollo 15 CDR (3x4 cropped).jpg - Wabbuh

CAPE CANAVERAL, Fla (KSC-71PC-569).jpg - OptimusPrimeBot

Apollo 15 crew portrait (S71-22401).jpg - OptimusPrimeBot

View of Apollo 15 Lunar Roving Vehicle and Lunar Module during simulations (S71-30542).jpg - OptimusPrimeBot

Artists concept of Apollo 15 crewmen performing deployment of LRV (S71-38188).jpg - OptimusPrimeBot

Artists concept of Apollo 15 crewmen performing deployment of LRV (S71-38189).jpg - OptimusPrimeBot

View of portion of "relatively fresh" crater as photographed by Apollo 15 (as15-82-11082).jpg - OptimusPrimeBot

Mission Operations Control Room (MOCR) Views - Touchdown - Apollo XV Lunar Module (LM) - Moon (S71-41424).jpg - OptimusPrimeBot

View of activity in Mission Control Center during Apollo 15 EVA (S71-41836).jpg - OptimusPrimeBot

Apollo 15 news briefing (S71-41842).jpg - OptimusPrimeBot

Mission Control Center (MCC) - Apollo 15 Launch - MSC (S71-41357).jpg - OptimusPrimeBot

During the Apollo 15 pre-launch activity in the launch control center's firing room 1 at Kennedy Space Center, the then recently appointed NASA Administrator, Dr (0302335).jpg - OptimusPrimeBot

KSC-71PC-577 (108-KSC-71PC-577).jpg - OptimusPrimeBot

ARTIST CONCEPT - ROVER ON MOON (APOLLO XV) - MSC (S71-39868).jpg - OptimusPrimeBot

KSC-71p-c-464 (71PC-464).jpg - Don-vip

View of St George crater and rille as seen by Apollo 15 (as15-82-11123).jpg - OptimusPrimeBot

Apollo 15 Lunar eclipse views (S71-58222).jpg - OptimusPrimeBot

Apollo 15 Lunar Module (LM) View - Liftoff - Moon - TV Monitor - Mission Control Center (MCC) - MSC (S71-41509).jpg - OptimusPrimeBot

Personnel - Stamps - Apollo 15 - MSC (s71-41694).jpg - OptimusPrimeBot

View of activity in Mission Control Center during Apollo 15 EVA (S71-41852).jpg - OptimusPrimeBot

Mission Control Center at conclusion of Apollo 15 lunar landing mission (S71-43429).jpg - OptimusPrimeBot

Plant - Growth - Apollo 15 - Lunar Material - MSC (S71-51318).jpg - OptimusPrimeBot

Flown Apollo 15 A7LB Beta Cloth Pouches (51344545164).jpg - OptimusPrimeBot